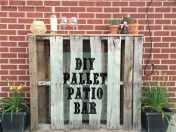
May 27, 2015 9:40 am
I can’t describe how excited I get about Summer, mostly because that means it’s Patio/Deck/Porch Season.
As I write this I am sitting on my patio, its a beautiful Spring evening, the sun is setting in the west over the Rockies, I’m drinking a glass of wine and listening to my Pandora Brian Crain radio station! Its perfect. Whats even more perfect is the pallet patio furniture that makes my patio such an inviting place to be.
Patio season (and therefore patio furniture) is great for a couple of reasons, most peoples patios can accommodate far more people than their homes, which means you can hang out with more people. And vitamin D (seasonal depression tends to hit me real hard so I LOVE when the sun comes out and I get to be a happy girl again)!
Last summer The Hubs got a fire pit so we could enjoy even more time outdoors during the long warm Summer evening but as I looked around there was very little seating and even less places to set anything…besides the ground.
Right around that time The Hubs and I stumbled upon a large stack of pallets for free. We brought them home and used one to refinish an old bookshelf of mine, we had about six more and I decided I wanted to make a coffee table and a bar, for our patio.
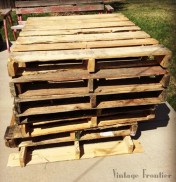
Pallets are a great material for DIY projects, especially if you want a more rustic or industrial look. But working with them is not for the faint of heart, especially if you need to take them apart. These pallets were pretty beat up so what we ended up doing was pulling the really beat up ones to pieces and using the decent parts of the beat up ones to fill in some of the other pallets.
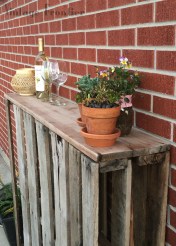
The process for each bar is going to be different because not all pallets are created equal. Basically what you are looking to do is sandwich two pallets together and stand them on their short side to create a small bar. We created a top and a bottom out of pieces of wood from our scrap pile. We had originally wanted to use paver stones for the top but after we tried that it seemed a little unbalanced so we just went with a nice piece of wood.
It makes a great drink station. We put all our cups there and also our blender (for margaritas of course!).
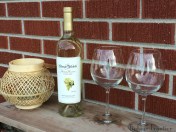
On a side note, The Hubs and I recently visited Seattle and visited our favorite winery, Chateau St. Michelle, we picked up this great bottle of Horse Heaven Hills Sauvignon Blanc. It is a great wine for summer patio drinking it goes really well with fish and pork chops. So go out and build a bar…and drink some wine…it’s summer time.


Posted by vintagefrontier
Categories: Yard and Garden
Tags: DIY, Outdoor, Pallets, Spring
Mobile Site | Full Site
Get a free blog at WordPress.com Theme: WordPress Mobile Edition by Alex King.
That is SO COOL!!! There are so many things you can do with palettes, seriously.
LikeLike
By Taylor on May 27, 2015 at 11:32 am
They are amazingly versatile. I only wish I had more space to fill so I could make more.
LikeLike
By vintagefrontier on May 27, 2015 at 3:21 pm
Very cool! I’ve been wondering about how to make our outdoor area more functional and attractive. I don’t know if this is the answer for us, but it sure does look good the way you’ve done it!
LikeLike
By thelittleredflag on May 27, 2015 at 2:35 pm
Thanks its a pretty fun piece. I have a few more to share in the coming days.
LikeLike
By vintagefrontier on May 27, 2015 at 3:20 pm
I think our deck needs a pallet bar! Time to scope out some pallets.
LikeLike
By Stephanie @ Sustaining the Powers on May 28, 2015 at 8:37 am
Let’s plan a date to go dumpster diving for some pallets. Ill bring the tools if you make the food…and those Margarita Matrini’s.
LikeLike
By vintagefrontier on May 28, 2015 at 6:59 pm
[…] this guy is just as easy as making the pallet bar from last […]
LikeLike
By DIY Pallet Patio Coffee Table. | VINTAGE FRONTIER on June 3, 2015 at 2:35 pm
Wow, this is perfect! I don’t have a porch or patio so something like this would be perfect for our yard when we entertain. Thanks so much for sharing this at the Welcome Home Wednesday link party…I hope we see you again next week!
http://www.diyjustcuz.com
LikeLike
By Brittany on September 21, 2015 at 11:36 am
Did you attach the bar to the wall somehow?
LikeLike
By Nina on November 13, 2016 at 1:00 am
Nina, we did not attach it to the wall. We used two larger pieces of wood for the top and bottom. And that provided a lot of stability. I will say, however, that we don’t have any little kids running around and that next year when we do we will probably find a way to attach it to the wall so it can’t be pulled over, it’s amazingly heavy.
LikeLike
By vintagefrontier on November 14, 2016 at 7:33 pm
thanks!
LikeLike
By Nina Lee on November 15, 2016 at 4:49 pm